Running a business is tricky, especially when you are trying to manage a database, send emails to your contacts, keep them organized, know who is interested and who you’ve called, and just knowing where everyone is at in your database. By using Infusionsoft Campaigns, you can Automate your marketing.
Finding the right CRM is a major part of this. We have used a few CRM programs in the past and recently made the switch to Infusionsoft, which has been incredible — especially when it comes to their campaigns.
We are not experts in these campaigns, and we are still learning all that they can do, but here are some fantastic internet marketing tips, tricks, and tools that we have learned and implemented so far to help automate our marketing and communication with our clients.
Getting Started with Campaigns
I’m not going to lie to you — Infusionsoft Campaigns are scary when you first look at them. There’s boxes, arrows, forms, decision diamonds, etc. This article is here to help make sure you understand the elements of these campaigns so that when you look at a Campaign, you understand what you are looking at.
Starting a New Campaign
In Infusionsoft, there are multiple ways to start a campaign. To access your existing campaigns or to start a new campaign, click on the Infusionsoft logo in the upper left corner, and then click “Campaign Builder” under the “Marketing” category.
Creating a Blank Campaign
Click “Create a Campaign” in the upper right corner. You will then be taken to a screen with a blank grid. This is your campaign board.
Duplicating an Existing Campaign
- Click on the name of an existing campaign to open it.
- Click “Campaign” in the upper left corner
- Select “Make a Copy” to have a new campaign be created with the same elements as the campaign you are currently in.
Using Campaign Templates
Infusionsoft has a “marketplace” where you can find templates and integrations to other programs that work with it. To find a template to use, click “Get Campaign Templates” in the upper right corner.
You will be taken to a template page where you can search for a specific template or browse them to see which one you may want to use. A decent majority of these templates are free. You can click “install” on the template you want, and it will open a new campaign for you automatically with the template elements already included.
Picked For You: Using Video in Your Online Marketing Campaign
Campaign Elements
There are many campaign elements to utilize that each has different functionalities. You can play with these to see which work the best for you and your goal for the campaign.

Goal
A Campaign Goal is a trigger for the campaign to start. Goals include:
- Form Submitted
- Score Reached
- Product Purchased
- Task Completed
- Note Applied
- Tag Applied
You can select which goal triggers your campaign. Your campaign can have multiple goals depending on what you are looking to accomplish. Be sure to watch the video included at the top of this article for a demonstration on goal options.
Sequence
A Sequence is basically the holder for anything that occurs following your goal trigger. This includes:
- Timers
- Start Timer
- Delay Timer
- Date Timer
- Field Timer
- Communications
- Send an Email
- Phone Call/Voicemail Options
- Fax Option
- Letter (assign a letter to a team-member to print and send out)
- Process
- Apply/Remove Tag
- Apply Note
- Create Task
- Set Field Value
- Assign an Owner
- Create an Opportunity
- Send HTTP Post
- Action Set
- Notes
- Notes allow you to make a note on the campaign itself for whoever is editing the campaign.

Email Confirmation
This option will automatically set up a sequence with an email and a timer requiring your contact to confirm their email before you send them the information that they requested. This is considered a “double opt-in.”
Notes
Just like the notes in a sequence, this option allows you to make a note on the campaign itself for whoever is editing the campaign.
Publishing Your Campaign
When you are finished creating your campaign, you can click the “publish” button in the upper right corner to make it ready to use. If there are any errors in the campaign, it will notify you and let you know what you need to fix before the campaign can be published. Be sure to pay attention to these, as it will let you publish if something is broken, but your campaign may not work properly.
You Might Also Enjoy: Getting Started with Pay Per Click Campaigns
Infusionsoft Forms
Forms are a fantastic goal to utilize for your campaigns and are the tools that we utilize most often. Forms can be used (but are not limited to) the following:
- To request a PDF Document
- To request more information on a property
- To receive more photos of a property
- To sign up for a newsletter
- To have a team member contact them
- To request a coupon from a hyperlocal blog
You can include these forms on your website to encourage your visitors to opt-in and be entered into your database. These forms can also be the source to trigger additional campaigns based on the information included in the form.
Creating a Form
- Add a Goal to your campaign and select “Submits a Web Form”
- Name the Goal whatever the purpose of this form is (contact us, download easter egg list, 1234 Rainbow Road Photos, etc.)
Once you have created the form, you will be taken to the form editor. By default, your form should include the following fields:
- First Name
Your editor will look similar to that of a blog post or word document, with common editing options such as bold, italics, underline, text alignment, font size, font color, links, etc. You will also see the following main tabs:
- Design
- Thank You Page
- Settings
- Code
and the following secondary tabs:
- Format
- Insert
- Snippets
- Field Snippets
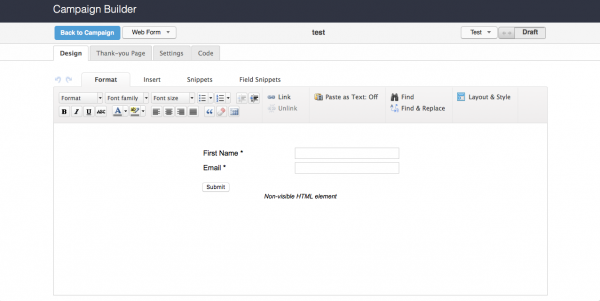
We are going to focus on the secondary tabs first.
Format
The format tab is your basic text editor. This tab also includes a “layout & style” option, which allows you to add some color to your form’s design.
Insert
This tab allows you to insert elements into a paragraph of text, as well as including special characters into your test. We rarely use this option for fields.
Snippets
Snippets include the following elements that you can insert into your campaign:
- Paragraph
- Title
- Spotlight
- Image
- Youtube Video
- Social Share Icons
- Spacer
- Divider
- HTML Codes
- Logo
Field Snippets
Field Snippets allow you to include different forms, check-boxes, drop-downs and more that your visitor can fill out on the form, including:
- Name
- Other (fields not listed on the toolbar)
- Radio Form (single button select)
- Phone #
- Checkbox (multiple button select)
- Address
- Captcha
- Hidden Fields
- Partner
These fields are going to be custom to whatever you would like the contact to provide when filling out the form.
Now for the main tabs:
Thank-You Page
Be sure to edit your thank-you page or include a link to a thank-you page that you may have created on LeadPages, Your Website, or another landing page source.
This Thank-You page will either include:
- a Confirmation with a promise of delivery of what they signed up to receive
- a link to the document/page/video that they requested
On the form editor under the Thank-You Page tab, you will see a drop-down for the “Thank-You Page to Display”. You can either display the Infusionsoft thank you page that you can edit, or link to a web address on your website, a LeadPage, or another landing page source. This is where they will go once the form is complete.
Settings
The settings are important, as they provide you with the option of how to check for duplicate contacts (we have found that using the email address has been the best, so far). It also allows you to select who gets notified once this form is complete, and what the subject of that notification will be titled.

Code
The code option will allow you to embed the form on your website, provide an HTML to your IT Representative to add it to your website coding for you, receive the link to include in an email or link to text on your website, and social share options.
We typically will include the form in an email using the “hosted” version OR we have the form automatically integrate with LeadPages for a more visually pleasing form or button to place on your website.
Form Content Triggers
When you contact is completing the form, you can have certain elements trigger a specific part of a campaign or another campaign entirely.
For example:
If you have a hyperlocal blog about Easter Egg Hunts in Las Vegas and they complete a form to receive a printable PDF of the hunts in Las Vegas, they aren’t really a lead, right? They are just requesting information on the area, not on your services specifically.
What you can do is include a radio form that includes the following options:
- Yes, I am interested in buying a home in Las Vegas
- Yes, I am interested in selling a home in Las Vegas
- No, I am not looking to buy or sell a home at this time.
When you add the radio form to your form by dragging and dropping the “Radio” option from your toolbar to where you would like it placed in your form, you will see a little price tag with a plus sign icon appear to the right of each option. This allows you to have a tag be applied to that contact, based on the option that they select.
You will want to make sure that each of these tags are set as a “Goal” for their own campaigns. One for Buyers and one for Sellers, so that they fall into the right campaign based on their selection.
This “tag-trigger” is available for the following Field Snippets:
- Radio Button
- Checkbox
Completing Your Form
Once your form is complete, be sure to mark it as ready by clicking on the “draft” toggle that appears in the upper right corner of your form editor. You will also see a “Test” option where you can test your form to make sure that it is working properly and takes you to the correct “Thank You” page.
Decision Diamonds

Decision diamonds are a very useful tool when it comes to campaigns. What decision diamonds allow you to do is have multiple outcomes for a single form, based on specific criteria that the contact meets.
For example:
If someone completes your Easter Egg Hunt form, you can have 3 different options of a follow-up email for them.
- If the tag “Buyer” exists in the contact’s profile, you can have an email sent to them with the information they requested, along with an IDX widget or link to properties in the area that they might be interested in or could potentially click on.
- If the tag “Seller” exists in the contact’s profile, you can have an email sent to them with the information they requested, along with a Home Valuation link and stats on home sales in the area.
- If neither of the above tags exist in the contact’s profile, you can simply send them the document with the option to sign up for a “hyperlocal events” newsletter for more information on events in the area.
Setting Up a Decision Diamond
When you set up your “goal” in your campaign, you can direct that goal to multiple sequences. In the above example, there are 3 sequences to include. I have called these sequences Buyer, Seller, and Hyperlocal. To name your sequences, double click on “untitled sequence” and you will be able to replace that text with your own text.
When you move your mouse onto the “goal” you have set up, you will see a green arrow appear. Connect this arrow to each of your sequences (you will need to click and drag individually for each sequence).
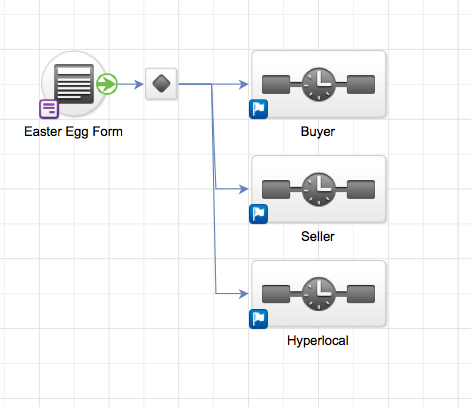
When your “goal” is connected to at least 2 sequences, you will see a diamond appear. Double click the diamond to edit the decision options.
You will see 3 sections titled:
- Rules for: Buyer
- Rules for: Seller
- Rules for: Hyperlocal
(the names after Rules for: will be specific to your campaign sequence names)
Click the button that says “+ Rule” on the first sequence to determine what you want the contact to have (or not have) in order for them to go into this sequence. I have listed my examples below:
Rules for: Buyer
If the Contact’s Tags Contains Buyer
Rules for: Seller
If the Contact’s Tags Contains Seller
Rules for: Hyperlocal
If the Contact’s Tags Doesn’t Contain Buyer
If the Contact’s Tags Doesn’t Contain Seller
By looking at these rules, I am telling the system that if the contact has the “Buyer” tag, that they need to be sent the buyer specific email. If the contact that the “Seller” tag, they need to be sent the seller specific email. If the contact isn’t a buyer or a seller, they need to be sent the hyperlocal events specific email.
These rules can be determined based on any field that the contact has, as well as tags. You will also see an option instead of choosing “Contact’s” you can choose “Form Submission’s” and base the rules off of options in the form, such as the radio form that we mentioned previously.
Automated Responding Based on Clicked Links
A fantastic way to keep up with communication with your clients is by having an automated response based on the customer clicking on certain links in your email. This works for contacts that are already in a campaign.
Continuing with the above campaign example, let’s say you have a link to view properties in the buyer email that goes out and you want an email to be sent to them once they click that link to introduce yourself, provide additional value, and give them a way to reach out to you if they have questions. Here is how you are going to set that up:
- Add a “goal” directly following the buyer sequence. Connect the two with an arrow, the same way that you connected the forms to the sequences. Let’s name this goal “Clicked on Listings.”
- Add a sequence directly following the “Clicked on Listings” goal and connect the two. Name the sequence “Follow-up email”
- Double click on the sequence to edit it.
- From the “communications” section, drag and drop the “email” option into the sequence.
- Double click on the email to edit it and include the details you would like them to receive in your follow up email.
- Be sure to mark these elements as “ready” once you are done with them (both the email, and the follow-up email sequence)
- Click the blue button in the upper left corner to go back to the sequence and then back to the campaign.
- Double click on the “clicked on listings” goal we set up.
- You will then see the email from the “Buyer” sequence with the option to select links in the email that will trigger the next part of the campaign. Click the blue box next to the link that you want to trigger the follow-up email (in this case, whatever link leads to listings).
- Click “Back to Campaign” to go back to the full campaign.
- Follow these same steps for the Seller and Hyperlocal campaigns, with follow-up emails that are relevant to each one.
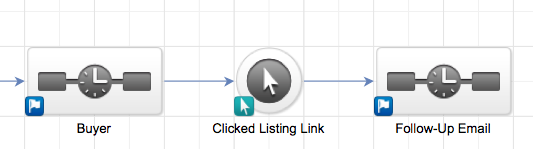
You can have the follow-up sequence also notify you with a task to call the person, apply a different tag saying they are interested in something specific, etc. This is customizable to your goals and how you want your database organized and set up. There is no “one way” to have your goals achieved through a campaign.
You Might Also Enjoy: Avoiding the Unsubscribe and Other Dangers of Over-Marketing
Infusionsoft Campaigns to Send Cards

It’s important to add a personal touch to your marketing. Our team does this by using Send Out Cards. We are using a program called FixYourFunnel to integrate Send Out Cards with Infusionsoft.
Our card campaigns are triggered by tags. These tags may include:
- Get Well Soon
- Baby Born
- Wedding
- Birthday
- Referral Thank You
- and more.
These campaigns are all set up the same way (with the exception of Birthday — but we will get to that in a moment).
Use the following steps to set up your card campaigns:
- Start a blank campaign
- Add a goal, name it whatever the card is pertaining to, and set the goal to be when a tag is applied.
- Double click on the goal to find the tag in your system or create a new tag.
- Add a sequence following the tag and name it “send card”.
- Connect the goal to your sequence.
- Double click on the sequence to edit it.
- From the “process” section, add the “send HTTP post” element.
- Double click on the HTTP Post and include the details required from your FixYourFunnel account for your sequence (fix your funnel has a support chat to help you if you don’t know where to find your card details)
- Add a “Delay Timer” from the “Timers” section after the HTTP Post.
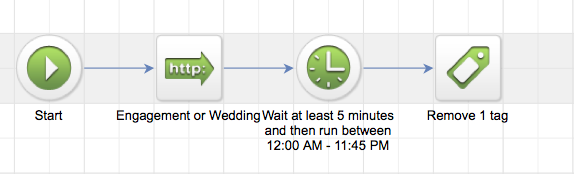
- Double click on the timer to edit it. Have it wait 5 minutes, run on any day, between 12 am and 11:55 pm.
- After the delay timer, go to “process” and add the “Add/Remove Tag” option.
- You are going to double-click this option to have the system remove the tag that you set up for the “Goal.” This way, if you need to send them another card a year from now with the same subject, the tag will not be on their record, and you can re-apply it to trigger the sequence once more.
- Make sure all elements are marked as “ready” and then publish your campaign.
Use the following steps to set up your birthday card campaign:
- Follow steps 1-6 from the regular card campaigns.
- In the sequence, you can include the card only or a card and an email, or just an email. If you want both, go to “Timers” and drag and drop a second “start” option underneath the existing one in your sequence.
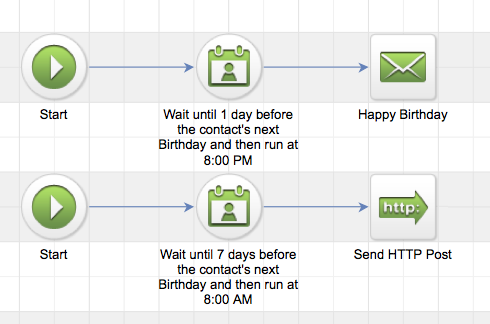
- We will start with the card — Go to “timers” and drag and drop a “field timer” option after the first “start” element.
- Double click on the field timer to edit it.
- Set the field timer to wait until 7 Days Before. Contact Field – Birthday – Next occurrence. At 8am. This will tell the system that 7 days before the contact’s birthday (a birthday needs to entered into the contact’s birthday field for this to work) send out cards needs to order them a birthday card and send it out.
- After the field timer, follow steps 7 & 8 from the regular card campaigns.
- Now for the email — Go to “timers” and drag and drop a “field timer” option after the second “start” element.
- Double click on the field timer to edit it.
- Set the field timer to wait until 1 Day before the contact’s next birthday at 8pm.
- From the “Communications” section, drag and drop the “email” element after the field timer.
- Double click the email to edit it.
- Make sure all elements are marked as “ready” and then publish your campaign.
Related: Low Cost Marketing Techniques
To Continue or Not to Continue
When setting up your campaign sequences, it is very important that you choose the proper course of action for each sequence. What this means, is that each sequence has 2 options for continuing:
- Stop when the next goal is achieved
- Continue to the end regardless of what goals appear.
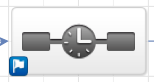
You may have campaigns that include both of these options, and that is fine. When you look at a sequence, by default, you see a blue flag in the lower left corner of the sequence. If you click on that flag, you will see two options:
- Blue Flag – Stops Immediately
- Green Arrow – Runs Until Completed
You will want to select the option that fits that sequence best for you. Here are some reasons you would want to utilize these:
Blue Flag
Here are some reasons you would want to use the blue flag in your sequence:
- If your contact has to achieve a goal in order to trigger the next part of a sequence.
- If you have a sequence running, but you want the entire campaign to stop if a specific goal is achieved.
If your contact has to achieve a goal in order to trigger the next part of a sequence, you will set it up in the same way that we set up the “Clicked on Listings” goal with the follow-up sequence. That goal is in the middle of the 2 sequences and has to be achieved to move on.
If you want your sequence to run, but stop if a goal is achieved, you will want to put the goal at the end of the campaign.
For Example:
If you’ve created a buyer campaign and your goal for that campaign is to get them to reach out to you about buying a home, you can make your “Goal” a tag titled “Contact Ready to Buy” or something to that effect. You will add that tag to the very end of your campaign and make sure ALL of your sequences are marked with a blue flag. This tells the campaign that if that tag is applied, to stop all of the sequences in the campaign.
Green Arrow
The green arrow tells the campaign to continue no matter what. We rarely use the green arrows, as all of our campaigns have a goal. We do, however, include the green arrow with single campaigns, at times.
For Example:
If someone fills out a form, we want to make sure that they are assigned to the right owner, tagged properly according to that form, etc. That is typically the first sequence that we include directly following the form. In this case, we want this sequence to run no matter what, so we make that sequence a green arrow.