Hi this is Sabrina, lead trainer for Ballen Brands and today I’m going to show you how to add a new user to your WordPress website. This will be specifically for if you are having people on your website that are going to be editing or writing content without having full access to edit your themes, plugins, and things like that!
This post contains some affiliate links for your convenience. Click here to read my full disclosure policy.
How to Add a User on WordPress
So the first step is to go to the back end of your website and go into ‘Users’ on the left side and then click ‘Add New’.
From there, it will ask you to create a username and you can choose whatever username that you want for that particular person.
Then you’re going to add their email address as well as their first and last name. There is also a section to add a website, but that isn’t required so you don’t have to worry about it.
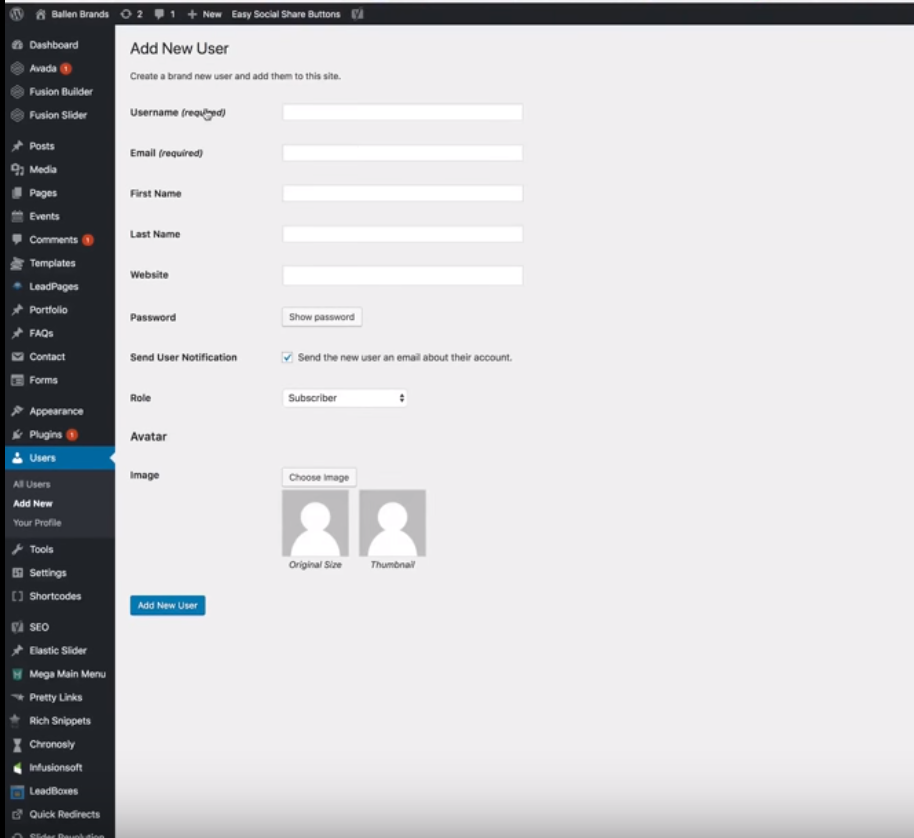
Next, you can set up a password for the new user and if you hit ‘Show Password’ then it will give you a temporary password that you can use or you can choose to type an actual password in. Then you can check the little box to send the user an email that will notify them about their new username and password.
Choosing a Role
So after you create the username and password, you need to select what role you want the user to have. This is really important because this is how you choose what you want them to be able to add or edit on your website.
You have the option of making them an author or an editor. Making them an author gives them access to only add and edit content that they have been assigned the author of.
If you make them an editor, it will give them access to add or edit any content, whether they are assigned to it or not. Making them an admin gives them access to everything you have access to.
How to Assign an Author
So if a user is and editor, then they can edit anything without being assigned to it – but if they are an author, then you have to allow them access to edit a specific post.
Now, if you go into ‘New Post’ and scroll down a little, you’ll see a section labeled ‘Author’. This is where you can select the user from the drop-down menu that you want to have access to edit this post.
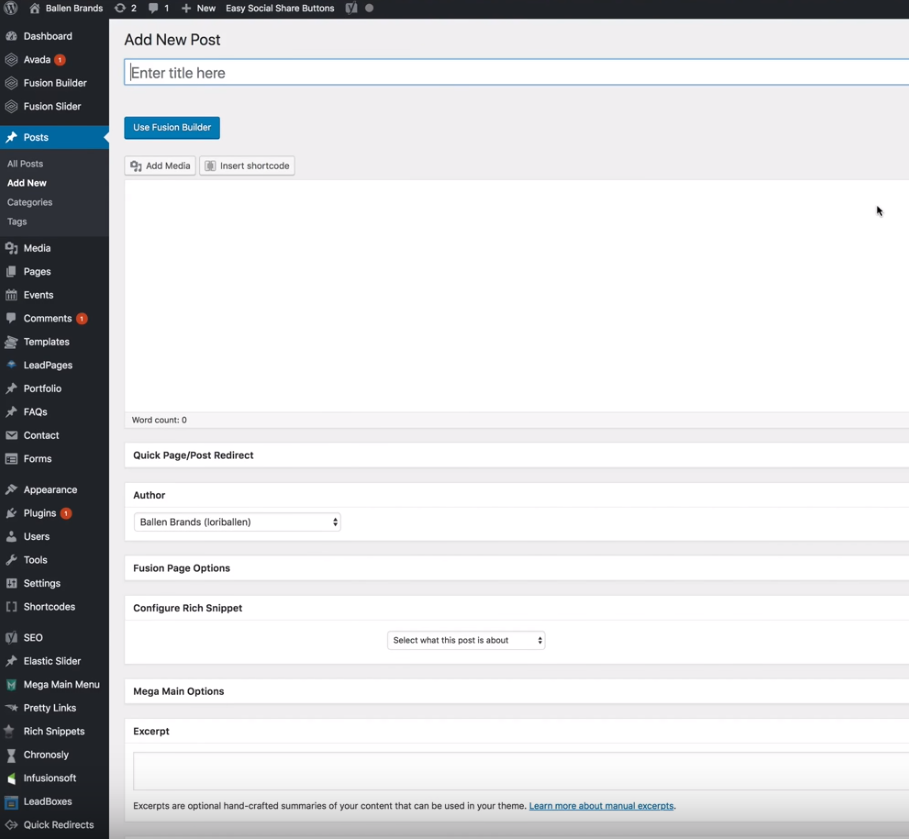
An important thing to remember to do is to change the author option back to yourself once they’re done adding or editing that content. Otherwise, it will show up on your website as if they wrote it, unless you choose to keep it that way.
For example, if you have a team of writers and you want to show who wrote what, then keep them as the author. However, if you want to make it seem like you wrote the content, then make sure to change it back to yourself.
New User Nickname
You can also create a nickname for your new user once you’ve created their account. To do this, just go into ‘Users’ on the left and click on the user that you want to edit.

Once you click on their name, it will bring you to their user page and if you scroll down, you’ll see a section to add a nickname.
The cool thing about choosing a nickname is that on the front end of your website, the nickname is what visitors will see. A good example to use is that you can make everyone’s nickname your own name or your team name and that way, if they work on something that is public, it will still show up as is you or your team wrote it.
So that is how you add users to your WordPress website! If you have any questions, you can always reach us at team@ballenbrands.com and if you want to learn more about online marketing strategies, head over to our YouTube channel, YouTube.com/Loriballen! Thanks for reading!
Related Posts

Best Real Estate Website Builders (And Why Agents Keep Choosing Ballen Brands)
This guide breaks down the best options on the market right now, what they do well, where they fall short, and how to choose the one that fits where your business is actually headed
How Long Has Your Real Estate Website Company Been in Business?
Your website can become the center of your online presence, helping support your branding, property search, lead generation, content marketing, local visibility, and client communication.
How to Decide If You’re Ready to Invest in a Real Estate Website
Before you invest, it helps to look at your goals, your capacity, your current marketing gaps, and the long-term role you want your website to play.
What You’re Actually Paying for When You Invest in a Real Estate Website
Before you decide whether the cost feels too high, it is worth slowing down and asking a better question: what are you actually paying for?

Best Real Estate Website Builders (And Why Agents Keep Choosing Ballen Brands)
This guide breaks down the best options on the market right now, what they do well, where they fall short, and how to choose the one that fits where your business is actually headed

How Long Has Your Real Estate Website Company Been in Business?
Your website can become the center of your online presence, helping support your branding, property search, lead generation, content marketing, local visibility, and client communication.
How to Decide If You’re Ready to Invest in a Real Estate Website
Before you invest, it helps to look at your goals, your capacity, your current marketing gaps, and the long-term role you want your website to play.
What You’re Actually Paying for When You Invest in a Real Estate Website
Before you decide whether the cost feels too high, it is worth slowing down and asking a better question: what are you actually paying for?